|
|
|
|
中文版 | News | Archives | Reviews | Forum | $ Deals | Links | History | Contact | Privacy |
|
| ||||
|
Thermaltake
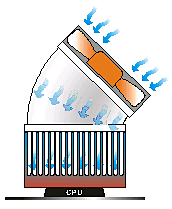
DuctingMod Here is how Thermaltake describes their new DuctingMod: "In traditional cooler design, the center of the heat sink won’t
have any air flow due to the fan hub resists air turbulence. Therefore the
air won’t be helpful the heat transfer to the heat sink center . With
DuctingMod, air can be blow into the fan ducting and spread the cool air
to the heat sink. By eliminating the air turbulence, we not only achieve a
better cooling capability, but also decreased the noise level associated
with it." Since I am not a qualified design engineer in air flow and dynamics, I will have to take their word on what the duct should or shouldn't do.
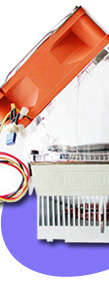
(DuctingMod -side view)
(DuctingMod shown with a Thermaltake SmartFan II attached) Initial Overview:The DuctingMod comes packaged in clear molded stiff plastic. Thus offering excellent protection from any rough handling it might experience. Included with the DuctingMod is a hardware pack that contains (4 ea.) small metal screws and (4 ea.) longer bolts with stainless steel nuts. The cardboard insert that surrounds the DuctingMod itself, have all the instructions that you will need to install this unit. Installation:The complete installation of the unit is accomplished in 3 simple steps. If you can use a screwdriver, you can have this new toy installed and setting back and enjoying your favorite cold beverage in about 15 minutes. Step 1 Remove the fan that is currently setting atop you Volcano 7, 9 or 11 Heatsink. There is no need to remove the actual heatsink from your PC since this is a low impact installation. Once the fan is removed and placed off to the side, the main install is ready to proceed.
Step 2 Now take the DuctingMod and place the unit squarely onto the heatsink and using the small metal screws that came with the kit; attach it to the shroud of your Volcano Heatsink. (a Philips screwdriver w/ a thin shaft is very handy for this part) Make note of is the direction you are going to have the Duct point to. In my installation I mounted it so that it was pointed towards the rear of the case. At the angle that is built into the Duct you will find in most cases that it will be pointed towards your top mounted exhaust fan. You can go ahead and securely attach the DuctingMod to the heatsink.
Step 3 Using the fan that was attached to your heatsink, or possibly using one of the new Thermaltake Smartfan II's orient it so the airflow is the proper direction for your application. Then using the long machine bolts that were provided, begin to place one in all 4 corners of the DuctingMod. Let's see those new Thermaltake Cases These screws also will be the same ones that attach your fan guard back onto your fan. The small nuts that will attach the fan to the duct, might look to be a bit of a headache if you have hands the size of hams like I do.
But someone in the design offices of Thermaltake have tried their best to make matters a whole lot easier for you. On the underside of the flange, where the nuts are seated, you will find small recesses that allow the nuts to set inside of them. This will greatly reduce the chance of you cross-threading one of the bolts and being forced to go shopping for a replacement. Very nice small touch on their part!
NOTE: The variable speed fan that sets atop my Volcano 7 uses a sensing thermistor for the speed adjustment. Since you are now putting the wire that is attached to the thermistor out of reach of its original placement, you will need to decide how and where you wish to have it. I opted for placing it inside the DuctingMod. Allowing it to be in the air passage directly beneath the fan. My reasoning being that it will sense the air temp as air passes over it and also it might be sensitive enough to read any heat coming up from the heatsink itself. Test Results:Here are some temps that were taken to show you just how much of a difference the Ducting Mod made on the test bed system. Motherboard: Chaintech CT-7VJL Processor: AMD 1800XP @ 138 FSB Heat Sink: Thermaltake Volcano 7 The first set of numbers are with the system un-modded and 45 minutes of burn-in using Sisoft Sandra and SuperPi in tandem.
(un-modded) These number are after installing the DuctingMod, using the same burn-in procedure. The CPU temp has dropped a surprising 2 degrees C, but for some unknown reason the case temp has gone up 5 degrees C. This makes me wonder if the addition of the DuctingMod reduced the amount of turbulent air (bad air) that is forced down upon the Heatsink. Perhaps with the additional amount of (good air) being directed at the heatsink, it is now pushing it away from the CPU outward into the case space.
(DuctingMod installed post 45 min. burn-in) ConclusionIn my opinion I can see no reason why everyone that owns a Thermaltake Volcano 7, 9 or 11 doesn't buy of these. For the price you can't beat the performance and the ease of installation. One other noted feature of this product is the reduction of the noise the fan on the Volcano 7 makes. By reducing the back-flow air pressure from the fan; the fan noise must be reduced by a minimum of 7 to 10 db. Acknowledgement:I would also like to personally thank Mr. Weller Chen and the fine folks at Thermaltake for allowing me the chance to review this product. I have been a big fan of Thermaltake since I first got into computers a number of years ago and they continually seem to find new and exciting product to offer us enthusiasts. If you are in the market for a new case, look no farther than the new Tt Xaser III V2. These cases are top of the line and offer everything any PC owner would want to have included.
(all photos used in this review are the property of Thermaltake) |
|
(C) Copyright 1998-2009 OCWorkbench.com
|